Wednesday, December 31, 2008

Baked Samosas


The other day I made a meat-pie and I really liked the crust a lot. I had found the recipe for the crust online and it was very simple. As I was appreciating the crust, it suddenly struck me “boy, wouldn’t this make good samosas?!”

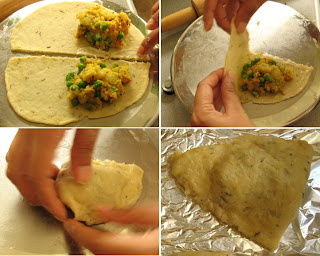
So, my next experiment was to
try making baked samosas with this delicious crust recipe. I am not a big fan of frying food – for health reasons and also because it gets messy and well, I just don’t know what to do with the leftover oil, so it sits on my kitchen counter until I throw it away. I don’t know if these baked samosas are much healthier than their fried counterparts – I hope they are. But you sure don’t have to stand around a hot frying pan!

There is a little bit of history about these too. The first trial run for the baked samosas was during the first presidential deba
te of 2008 “J-Mac Vs. O”. We were both eagerly waiting to hear what the candidates had to say for themselves, so I pre-prepared the samosas and arranged them on the baking sheet, so that they were ready to be stuck in the oven and baked, while I sat and watched the debate. As for the results? Well, O won the debate hands down and, sigh, I had to make the samosas again for Dan, for the next vice-presidential debate, between Sarah six-pack and Joe the Biden!

Do try them out and let me know if they are any good.

Ingredients:

*Recipe for the pastry can be found here, many thanks to them. I have also written it out for convenience.

For the Crust/Pastry:
2 cups all-purpose flour
2 teaspoons baking powder

½ teaspoon salt
½ cup butter
1 egg, beaten
¼ cup cold water
1 teaspoon lemon juice

1/2 teaspoon dried thyme, crushed

For the filling:

6 medium potatoes (boiled)
11/2 cups peas
1 inch ginger (minced)

2 serrano peppers (chopped)
1 tsp cumin seeds
2 tbsp oil

1 tsp turmeric powder
1 tsp cumin powder
2 tsp coriander powder
1 tsp ground black pepper
½ cup chopped cilantro

salt to taste

Pastry “glue”:

½ cup flour + water (your own approximation), stirred to form a thick, sticky slurry (mixed evenly to get rid of flour clumps)

Method:

Pastry Dough:
1. Mix in the flour, baking powder and salt. Cut in tiny pieces of butter and add to the flour mix. Start kneading the dough till it gets evenly crumbly.
2. In a small bowl beat the egg, along with water and lemon-juice. Add thyme and beat some more. Add this mix to the doug
h, while kneading constantly, one spoon at a time. Set the dough aside.

Filling:
1. Boil 6 medium potatoes, till they are soft at the center, but still quite firm. Peel off the potato skin and mash using a fork
till you get small chunks (do not mash evenly, as you would for mashed potatoes).
2. In a wok heat oil and add cum
in seeds. When the cumin starts sizzling, add ginger, followed by potatoes and peas. Add turmeric, coriander, salt, cumin powder, black pepper along with the chopped serranos and cilantro. Stir the mixture and cook with the lid on for about 3-5 minutes.

Assembly:
1. Take a small ball of the prepared dough, (roughly an inch and a half in diameter) and roll into a circular disc, approximately 5-6 inches in diameter.
2. Cut the disc in half, as s
hown in the picture and add about 1/3 cup filling to one side of each half. Apply the pastry glue along the edges of each half, as in the picture.
3. Lift the other end of the “half disc” and fold over the filling. Pinch the ends around the filling to “seal” the samosa. Repeat the
same for the other half-disc.
4. Arrange the samosas on a baking sheet.
5. Bake the samosas in the oven at 400F for 20-25 minutes, till golden brown.

Saturday, December 27, 2008

Ksra: Moroccan Bread recipe


We’ve been baking a lot of bread lately. So much so that I’ve considered the idea of starting a separate blog dedicated to bread baking. Anyone interested in a bread blog? What started as a one time attempt to make bread has now turned into a rewarding weekly event. Lets face it, home baked bread is so much better then the store bought variety. The following recipe for Ksra evolved out of our interest in Moroccan cuisine. It develops an amazing thick crust with the addition of anise and caraway provides a lovely aroma and unique flavor. While the bread is a natural complement to Moroccan foods like chicken or lamb tagine, it is also delicious on it own or served toasted with scrambled eggs.


Ingredients:

3 cups unbleached bread flour

½ cup rye flour

2 tsp active dry yeast

1½ tsp sea salt

1 tbsp Caraway Seed

1 tbsp Anise Seed

1½ Cups lukewarm water

2 tbsp vegetable oil

Coarsely ground corn meal (for coating)

Method:

  1. Mix all dry ingredients in a large bowl. Add the water, and mix until well combined. You should end up with a sticky, choppy looking dough that initially will seem quite unmanageable. At this point add the oil and begin kneading the dough in the bowl until the oil is incorporated.
  2. Turn the dough out onto a clean unfloured countertop and begin kneading vigorously for 8-10 minutes to develop the gluten. The dough will stick a little to counter top. That’s okay, just scrape off any stuck dough and continue kneading. You don’t want to add any additional flour at this stage as it’ll change the water content of the bread. With continued kneading the dough will stiffen up significantly and have a glossy appearance.
  3. Place the dough in a large bowl at least three times the bread volume, cover tightly with plastic wrap and let the bread ferment for about two hours, or until doubled in volume.
  4. When the first rise in completed set the oven to 425ยบ and turn the dough out onto a clean countertop. Now the dough can be shaped into a tight round in preparation for baking. To shape, flatten the dough slightly, and then fold the top down, and then the bottom up, so it is folded like a business letter. Then fold in the sides in the same way as before. Now flip the dough so the largest seam faces down and begin stretching the dough in towards the bottom seam to form a tight ball of dough.
  5. Place the shaped dough seam side down onto a baking sheet sprinkled with coarsely ground corn meal and then cover the dough with a well floured tea towel. Let the dough rise until doubled, about 1 hour.
  6. Remove the towel and bake in the oven 35-40 minutes until the bread reaches a rich brown color and sounds hollow when tapped with a spoon.

A Not-So-Traditional Christmas Menu


This was our first Christmas together and also our first without snow!! Although, we did drive 50 miles east of the city, up to the Cuyamaca Rancho State Park, where there was about 5-6 inches of snow on the ground!! San Diego has its own special Christmas charm. The red berry-bushes are in bloom all over the county and makes a pretty site.

My parents sent us a nice flower arrangement and chocolates. And we got few more goodies from Dan’s family. Craving Snicker Doodle cookies, Dan made a small batch, which we had on Christmas eve. So, for our Christmas meal we cooked Moroccan Meatloaf accompanied by Moroccan Bread, Pomegranate BBQ sauce and Mashed Potatoes. I baked an Almond-Chocolate Cake. My mother-in-law was slightly perplexed by our not-so-traditional Christmas menu.

Here are some pictures.


Sunday, December 21, 2008

Spicy Korean Beef Curry


The inspiration for this recipe is our wonderful Korean friend’s wife.

It was to be our last summer on Long Island. Both Dan and I were stuck in our own terrible housing situation. The only affordable housing in and around Stony Brook is to rent garages (converted into studios) from people living close to the University, unless you want to share a house with a handful of *extremely clean*, like minded individuals. So, anyhow Dan was having fun in his spider-infested garage, when one day his land-lady informed him that he was being traded in for a Korean art-professor. In retrospect, that was one of the best things that happened during his stay there. Dan made friends with the Korean Professor. We had quite a few-get-togethers including an Indian dinner (prepared by Shiva), Mexican night (by Dan) and several Sushi dinners accompanied by several bottles of Soju (hosted by our friend). But one of the most amazing meals we had was the Korean pork curry with sesame leaf and Ramen noodles made by our friend’s wife. It was something very unique from the meals you get at most Asian restaurants in this country.

Recently, one of our friends introduced us to a lovely Korean market in San Diego (Zion Marketplace). We decided to try and recreate the Korean curry. So, after some internet-research and couple of trial rounds, we came up with this recipe. We can only hope that it as good as our friend’s. Combat!

Ingredients:

Marinade:
3 tbsp soy sauce
2 tsp canola oil
3 tbsp rice wine
2 tbsp chili sauce
1 tsp sesame seeds
½ tsp black pepper (ground)
3 tsp sugar
4 cloves garlic (minced)
½ inch ginger (minced)
½ c scallions (finely chopped)

1 lb beef (thinly slices, cut into strips)
½ lb broccoli (small to medium sized florets)
1pkt noodles

Method:
1. Add the beef to marinade and refrigerate overnight.
2. In a wok combine the broccoli along with the marinated beef. Cook for about 8-10 minutes till beef is browned and the broccoli is tender.
3. While the beef is cooking, prepare the noodles as per the directions on the packet.
4. Serve the beef along with the sauce (from marinade) over a plate of steaming noodles.

Notes: For my vegetarian friends: substitute beef with fried bean curd or steak tofu.
Make a wrap, filling the sesame leaf with beef curry. The leaf has a characteristic anise-like flavor that complements beef very well.


Monday, December 1, 2008

Thanksgiving Pictures: Dan’s Weaved Apple-Cherry Pie Crust


Last week was Thanksgiving – it felt more like early New York fall here in San Diego. The leaves have barely turned and the highs are in the 70’s. I miss the crispness in the air and the falling yellow, red and brown leaves (although it’s way past that time in New York) – they are probably now talking about snow there. Well yeah, grass is always greener on the other side. I shouldn’t be complaining about San Diego – the fabulous sunsets we’ve had this month, have been absolutely breathtaking.

So, its day before thanksgiving and Dan suggests we make an apple-cherry pie with a weaved pie top –and I 'm like “yeah, I’m not doing this, it’s too difficult!!” So, move away Shiva, Dan’s in charge of the pie. Wow, just look at that pie top (and this is the first time he did it). Amazing!!!

Sunday, November 30, 2008

Cranberry-Ginger Chutney


This recipe is a nice twist on the traditional cranberry sauce. The addition of ginger and grapefruit gives a nice ‘zing’ to the flavor.

Ingredients:
1 lb fresh cranberries
1 inch fresh ginger (very finely chopped)
juice from ½ grapefruit (ruby red, or pink)
1 teaspoon grapefruit rind
1 c water
1 c sugar

Method:
1. In a saucepan, combine water, sugar, ginger and grapefruit rind. Bring the mixture to boil, constantly stirring. Reduce the heat to low.
2. Squeeze in the grapefruit fruit juice. Add in the cranberries and continue to stir.
3. The cranberries will start popping. When the mixture thickens considerably, turn off the heat.
4. Let it cool. Store in a glass jar and refrigerate.

Sunday, November 23, 2008

Palak Paneer


Nandita, this recipe is for you. I know you already have it – but it brings back fond memories of the party at your house and the wonderful reunion we all had!

Ingredients:
2 medium-large bunches spinach (loosely chopped)
1 large onion (sliced)
2 medium tomatoes (chopped)
10-12 pieces paneer (cubed)
4-6 cloves garlic (minced)
½ inch ginger (minced)
1 tsp cumin seeds
½ tsp asafetida (heeng)
1tbsp ghee/butter/oil
2 c milk
Salt to taste

Garnish(Tadka):
1tbsp ghee/butter
1 tsp cumin seeds
4-6 red chili peppers

Directions:
1. In a wok, heat the ghee (alternatively, butter or oil) on high heat. Add cumin seeds, followed by the asafetida.
2. When the cumin seeds start sizzling, add ginger and garlic. Lower the heat to medium and stir till the mixture becomes golden-brown. Now add the onions and stir occasionally till they start to brown.
3. Add the chopped spinach to the wok. At this point I usually add salt - it releases the flavor and water from the spinach. Cover and let the mixture simmer on low heat, till the spinach looks wilted. Add the tomatoes to the mix. Replace the cover and simmer for 5-8 minutes. Turn the heat off and allow it to cool for a few minutes.
4. Using a blender, puree the spinach mix to a smooth consistency. Return the puree to the wok. Stir in the milk and simmer on low.
5. Add the paneer pieces and continue to simmer for 5-10 minutes.
6. Garnish: In a tiny saucepan melt ghee/butter. Add the cumin seeds followed by the chili peppers. Turn off the heat when the peppers start to crackle and appear deep red.
7. Add the garnish (in hindi this mixture is called “tadka”) to the palak paneer. And voila, it’s ready!!

Notes:
I have posted the recipe to make your own paneer from milk. Paneer is also readily available at most Indian grocery stores. In my experience using ghee (clarified butter) for cooking gives it the best flavor. Ghee is also available at the Indian grocers and the Whole Foods marketplace. Use of asafetida/heeng is optional (the recipe is almost as good in flavor without it).

Sunday, November 16, 2008

Polenta with Goat Cheese and Roasted Veggies


I recently discovered the yumminess of Polenta. Polenta is essentially corn grits; its use is common in Italian and Spanish cuisine and has spread to other culinary styles.


I absolutely love corn and I am actually quite disgusted by the “super-sweet corn” that is widely sold in most grocery stores. I find the idea of genetically modified, excess sugar producing corn, unpalatable. Considering the biodiversity of corn crop in this continent, it’s mind-blowing to think that the super sweet corn is the only choice you have.


The reason to buy polenta – it has that wonderful corn flavor, without the artificial sweetness!! It makes a delicious breakfast meal!! And it’s a quick fix!!


So, here is my recipe:

Polenta:

1 cup corn grits

3 cups water

1/2 cup green onions (scallions), chopped

1/3 cup goat cheese

2 tbsp red chili paste (or cayenne pepper powder)

Salt to taste

Roasted Veggies:

1 medium zucchini cubed

1 red bell pepper cubed

3 cloves garlic minced

1tbsp olive oil

Black Pepper and salt to taste

Directions:

  1. Bring the water to boil (add salt to the water to make it salty according to taste).
  2. Add the chopped scallions and reduce heat to simmer.
  3. Now slowly add the corn grits, stirring constantly.
  4. The polenta will expand and mixture will start to thicken. This won’t take very long (between 3-5 minutes).
  5. Add the chili paste to the polenta when almost all the water has been absorbed.
  6. Slowly stir in the goat cheese, turn off the heat and let it sit.
  7. In a skillet, add all the ingredients for the roasted veggies.
  8. Cook on medium to high heat, till the zucchini is brown and tender and the veggies start to sizzle.
  9. Serve a dollop of polenta topped with the roasted veggies.

Notes:

Goat cheese has a very intense flavor - so if you are not a goat cheese fan, go with the cheddar. I’ve noticed that the chili paste gives it a very distinct flavor. I use the stuff Dan makes at home with New Mexico red chilies - I’ll have him post the recipe one of these days). A good substitute for the chili paste is cayenne, which makes it quite spicy.


Saturday, August 30, 2008

Making Paneer from Scratch


I thought it would be fitting to inaugurate our Blog with our hands down favorite Indian food - paneer. Paneer is the most widely used cheese in the Indian cuisine and is a major ingredient of several popular Indian meals and desserts.

There is nothing like home made paneer- it’s really tender, fresh and so much better than the store bought variety. And hey - you can save yourself a trip to the local Indian grocery store!!

Ingredients:
1 gal vitamin D, whole milk (I go for the rBST/growth hormone free variety)
½ cup distilled white vinegar or lemon/lime juice
cheesecloth

Directions:
Biochemistry 101: low pH + heat = protein precipitation (milk coagualtion)
1. Bring the milk to a rolling boil in a heavy non-stick pot.
2. Turn the heat off and slowly start adding the vinegar/limejuice, stirring constantly.
3. Paneer slowly curdles out, leaving the whey off-colored and transluscent.
4. Let it stand for about 10 minutes. Drain off the whey and collect the paneer in a cheesecloth of appropriate size.
5. Try to squeeze off any remaining whey from the paneer. I sometimes weight it down for a few hours to make it firm. While doing this your may mold it into a block. Remove from the cheesecloth and refrigerate or freeze, based on your needs.

Notes:
I remember the first time I tried this, I added the vinegar too soon and essentially ended up in plenty whey and hardly any paneer. So definitely, you have to let the milk boil nicely. Low fat milk is an absolute no-no. Paneer is essentially protein + fat, so you don’t want to go the low fat way here.